In this tutorial you will learn how to import flat files (text files containing XML, comma separated or fixed width records) automatically.
You will need to:
- Check your setup
- Setup a work queue
- Setup removal command
- Create a processing workflow
- Connect the workflow to the queue
##1. Check Your Setup
Make sure these parameters are set in your server’s AsapSettings.config file:
<LoadExternalWorkQueues>true</LoadExternalWorkQueues>
<ExternalWorkQueueCheckPeriod>180</ExternalWorkQueueCheckPeriod>
Set up the ExternalWorkQueueCheckPeriod to any number of seconds you want the files being checked.
Only one application server should be configured for loading external work queues otherwise the servers will compete on e.g. picking up the same e-mail box or taking files from the same folder.
Also make sure that your application server has full access rights to the folder containing the files to be imported. The server will need to read the files and delete them afterwards.
##2. Setup a Work Queue
Now you will need to setup a work queue.
Work queues are like inboxes for different kinds of messages. You can define a structure of your queue (using a Work Queue Class in ORIGAM Architect) so it contains different data columns e.g. for handling order processes.
In our case we will use a predefined TextFile work queue class which will just contain a copy of a text file.
Open Work Queues configuration menu item in your application and create a new entry:
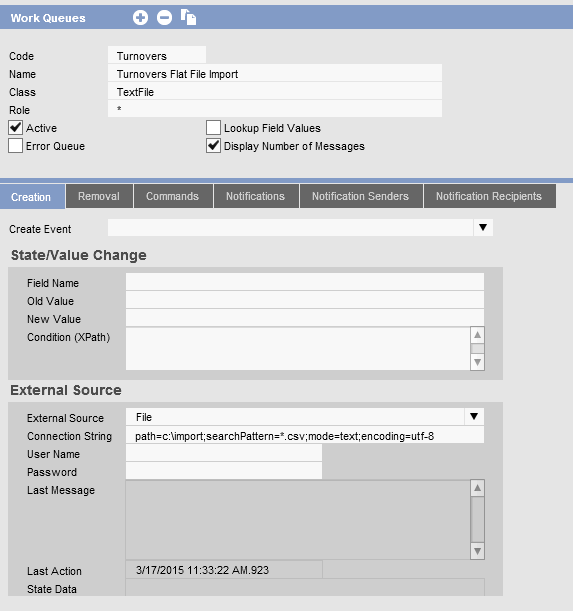
Please note that we are using a
TextFile work queue class and a File external source. External source will take care about automatically getting us some data, in this case files from a configured folder. Check the File loader documentation for different options you have with importing files to queues.
After saving the work queue configuration the server will start to pick up the files from the folder automatically. After picking the file will be deleted from the source folder.
You can see the import status in the Last Message and Last Action fields.
Last Message – contains either the number of files picked or an error message if something went wrong.
Last Action – contains a time of last import. It should always update by the period defined in the settings.
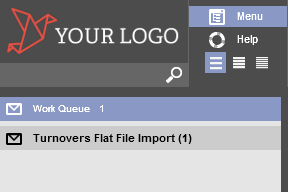
Finally check if files were imported in the Work Queues section in your client application.
With the following result:

##3. Setup a Removal Command
Now that you have the files successfully imported in the queue we will first make it possible to remove the message with the following simple setup.
- Open the Work Queue configuration in your application
- Select the desired work queue and add the following command uner the Commands tab.
- Save.

Now when you open your work queue from the work queue list you will see a new “Remove” button just like you set it up.
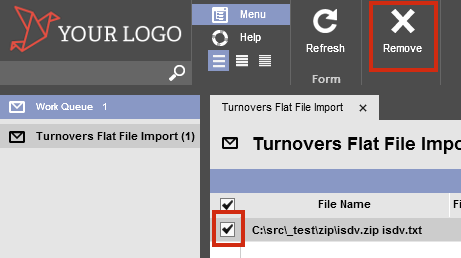
After selecting the queue item and pressing the Remove button the item will be deleted from the queue.
##4. Create a Processing Workflow
You need to create a sequential workflow In order to parse the files and save the data to the database (or process them in any other way).
The workflow must have an input context store with a data structure set to the work queue’s data structure, in our case WQ_TextFile.
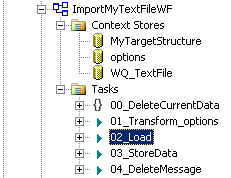
Work queue will pass the data to this context. After that you can process the file anyway you want.
Example WQ_TextFile content:
<ROOT>
  <WorkQueueEntry refId="174d4d37-b4ab-4c97-a635-16fd5f31e53e" refWorkQueueId="0fb3de46-178a-4028-8945-5b91578bf27d" RecordCreated="2014-05-13T19:24:16.0870000+02:00" IsLocked="true" FileName="13.05.2014 #91" Id="174d4d37-b4ab-4c97-a635-16fd5f31e53e" refLockedByBusinessPartnerId="5d4e4d56-12bf-43f9-b7dd-89c5dd3f506d" RecordCreatedBy="53932317-3c83-40d5-aa52-c6cd33803bef">
    <Data>13.05.2014 #91
country|currency|unit|code|rate
Australia|dollar|1|AUD|18,734
Brasilia|real|1|BRL|9,035
Bulgaria|lev|1|BGN|14,011
China|renminbi|1|CNY|3,211
Denmark|krona|1|DKK|3,671
EMU|euro|1|EUR|27,405
</Data>
  </WorkQueueEntry>
</ROOT>
In this case you would parse the Data section containing exchange rates and store the results to the database. You can also use FileService.ReadTextFile service method to parse textual data automatically.
The WQ_TextFile context can contain more than one entries in case you allowed the user to select multiple entries.
##5. Connect the Workflow To the Queue
Finally we need to connect our sequential workflow to the work queue we defined. First we will connect the workflow to the TextFile work queue class and then we will use it in the work queue configuration.
- Right click on TextFile work queue class (Business Logic > Work Queue Classes > Text File) and choose New > Workflow Command.
- Specify the following properties:
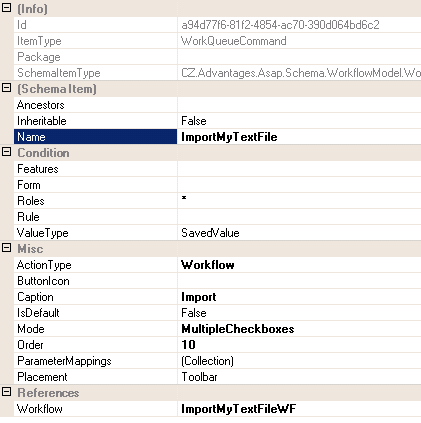
You should specify Mode =MultipleCheckboxesso the user can select more files and process them at once.
The Name property will be used to identify the command later in the work queue configuration. - Save the command.
- Now right click on the new command and choose New > Parameter Mapping (with the dot, not a question mark).
- Specify the following properties:
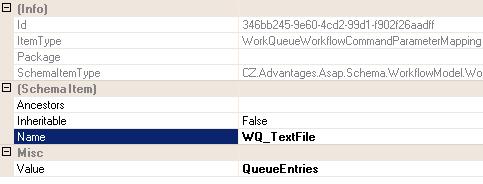
This way you pass the selected work queue entries to your processing workflow’sWQ_TextFilecontext store. - Open the work queue configuration in your ORIGAM application and add a new record to the Commands tab (as we did earlier with the Remove command):
This will create an Import button in the work queue. By pressing the button the sequential workflow for data import will be executed and current work queue item will be passed.
