Html client plugins can be used to implement features not supported by origam and to supplement origam modeling where necessary using a piece of custom react code.
There are two kinds of plugins so far, both of which can use javascript/react to create a custom user interface. The section level plugin has access to screen section data and can be used to display them. The screen level plugin can change data fed into section level plugins by modifying the screen parameters.
We will demonstrate how to get started with the plugins on Audit screen from the Audit package which you can find it in the standard origam distribution. The hello world style plugins we will create here won’t do much but you can find a more complex implementation of the Audit view using plugins in the plugin-audit repository.
Before you start creating a plugin make sure you have origam Root package version 5.1.8 or higher.
Plugin Placement
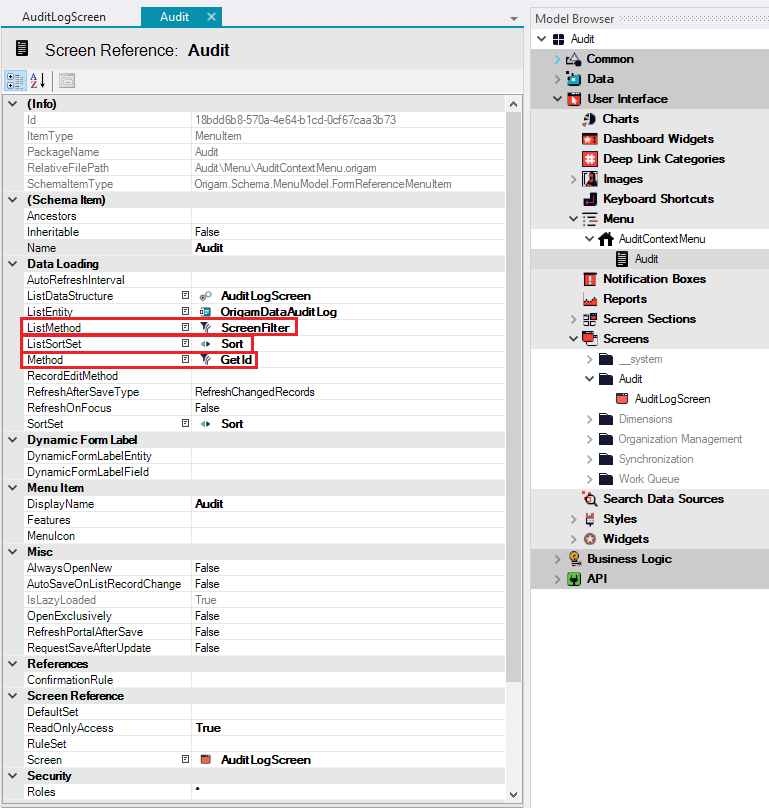
The plugins can be placed on any screen. We will put it on a lazy loaded screen. To make a screen lazy loaded you have to specify a ListMethod, Method and ListSortSet in MenuItem.
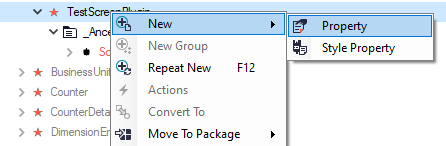
Next create a new widget which will inherit from the widget type you intend to use (ScreenLevelPlugin or SectionLevelPlugin). To create a new widget go to User Interface → Widgets → Basic Controls the right click the Basic Controls folder and choose New → Widget. This is what the TestScreenPlugin should look like.
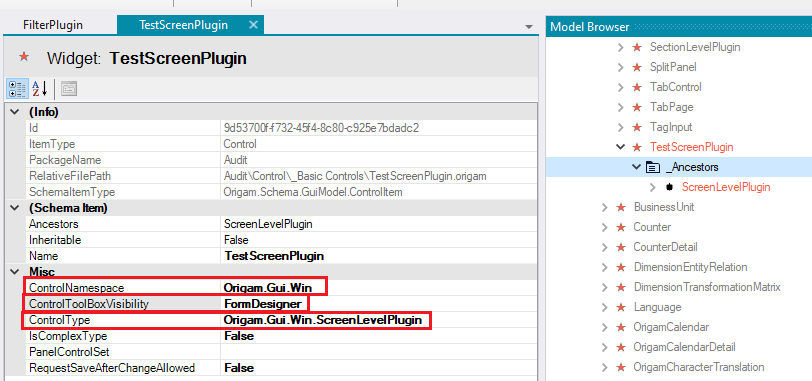
When creating a new plugin widget be sure to set the ControlNamespace to Origam.Gui.Win, ControlToolBoxVisibility to FormDesigner and the ControlType to the ControlType of the plugin widget you are inhereting from.
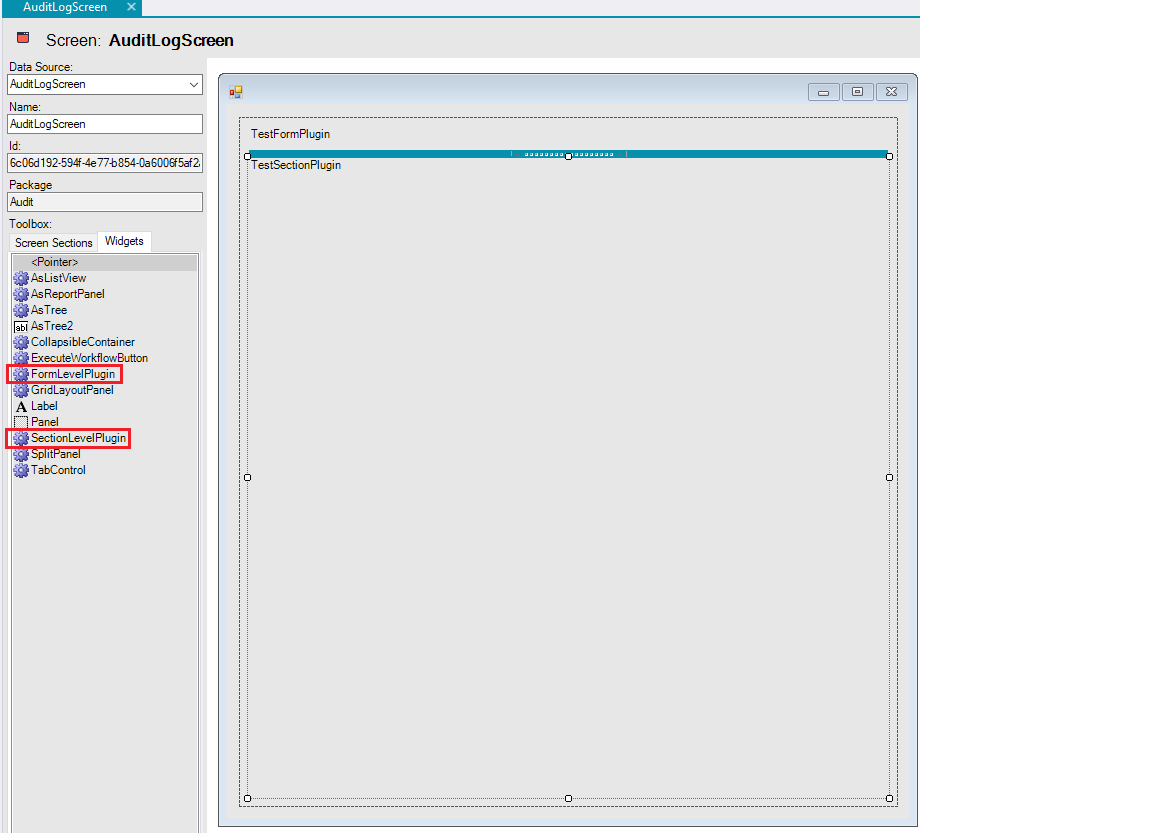
Then you have to place the plugin widget on a screen. This is done in screen editor in Architect.
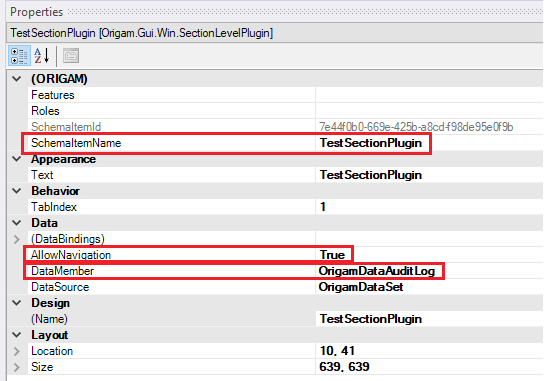
In the widget properties you have to specify the plugin’s SchemaItemName. Name the screen level plugin TestScreenPlugin and the section level plugin TestSectionPlugin. The section level plugin needs a DataMember so be sure to select one here. Also note that exactly one SectionLevelPlugin in the section must have the property AllowNavigation set to true. This is an equivalent of one screen section being a master and others details. So the AllowNavigation property would not be set to true if there were a master screen section here.
Custom Attributes
You can pass custom attributes to your plugin to make it configurable from the model (however we do not need the attributes in this demonstration). This is done on the plugin widget (User Interface → Widgets → Basic Controls)
To define the attribute add a new property by right clicking on the Properties folder. You will see the property in the screen editor after you place the new plugin widget on it.
The property name and the value you specify in the form designer will be included among the xml attributes. You can read these attributes in the method initialize in the react plugin implementation. Note that the component might be rendered before the initialize method is run so you will probably have to store the attribute value in a state field like in the snippet below.
  @observable
  customAttribute = "";

  initialize(xmlAttributes: { [key: string]: string }): void {
    this.customAttribute = xmlAttributes["customAttribute"];
  }
Running the Client
To create and debug a plugin you have to compile the html client application. First clone the Origam repository somewhere on your machine. Then follow the how to start guide to setup the Origam development environment.
Note that you don’t need to build and run the server fom the sources if you just want to develop the fronend plugins. You can use any running origam server you have access to: installed in IIS or in docker, local or remote. Just note the address and port the server is running on and madify the proxy target nodes in the origam\frontend-html\vite.config.ts file.
Then you can run the project with this command at origam\frontend-html
yarn start
a development server should be started at https://localhost:3000/ when you go to that address you should see the client application.
Creating the Plugin
The client is written in typescript and react. You can use any javascript editor to edit the project like Visual Studio Code for example. First we will create a plugin boiler plate with a python tool which is included in the Origam repository. The files will be created in a directory you specify somewhere outside of the Origam repository. The idea is that the plugin files will have their own git repository here and you will copy them using the python tool to the Origam source when you want to build the Origam client application with the plugin. If you make changes to the plugin source files or the yarn.lock you use the python tool to copy the modified files back and then commit the changes to the plugin repository. Note that the python tool does not create the git repository that is up to you. The python tool can be found here:
"origam\plugins\pluginmanager.py"
First copy the tool template configuration origam\plugins\_pluginmanager_config.json file to origam\plugins\pluginmanager_config.json and remove the plugins section so that the file looks like this:
{
  "pathToOrigamRepo": "C:\\Repos\\origam",
  "plugins": { }
}
Also change the pathToOrigamRepo to the path where you cloned the Origam repository.
Then run the tool in any python 3 interpreter. You will only be presented with the 0 Create new plugin option since you have created no plugis yet. Type 0 and hit enter. Next type the plugin name TestSection and hit enter. Then you will be asked to input the path where the plugin files will be created. Choose some place on your drive outside of the Origam repository. For example C:\OrigamPlugins. The files will be created when you hit enter.
Open the plugin folder and look at the generated files. Here note the package.json file. The version string inside will be displayed when you click on your user name at the top right corner in the Origam client application and then click About. So be sure to update it when you make changes to your plugin. The depenedncies node should contain your plugin’s dependencies. These will be copied to the package.json in the Origam client application in the next step.
The tool is limited to creating one plugin. That means if you want to create another plugin with the tool the new plugin will live in a separate folder named after the plugin. But we want to place two plugins in the same folder. To do that we will add the other plugin file manulally. It also makes sence to rename the created directory from C:\OrigamPlugins\TestSection to C:\OrigamPlugins\TestPlugins since there will be two plugins in it. Go ahead and rename the folder and then open the config file origam\plugins\pluginmanager_config.json and rename the entry there as well. Don’t forget to change the paths in the config file to reflect the changed folder name.
Now we will create a new file at C:\OrigamPlugins\src\TestPlugins call it TestScreenPlugin.tsx and copy the following code into it:
import React from "react";
import { ILocalization } from "plugins/interfaces/ILocalization";
import { ISectionPluginData } from "plugins/interfaces/ISectionPluginData";
import { ILocalizer } from "plugins/interfaces/ILocalizer";
import { IScreenPlugin } from "plugins/interfaces/IScreenPlugin";
export default class TestScreenPlugin implements IScreenPlugin {
$type_IScreenPlugin: 1 = 1;
id: string = "TestScreenPlugin";
requestSessionRefresh: (() => Promise<any>) | undefined;
setScreenParameters: ((parameters: { [p: string]: string }) => void) | undefined;
getComponent(data: IScreenPluginData, createLocalizer(localizations)): JSX.Element {
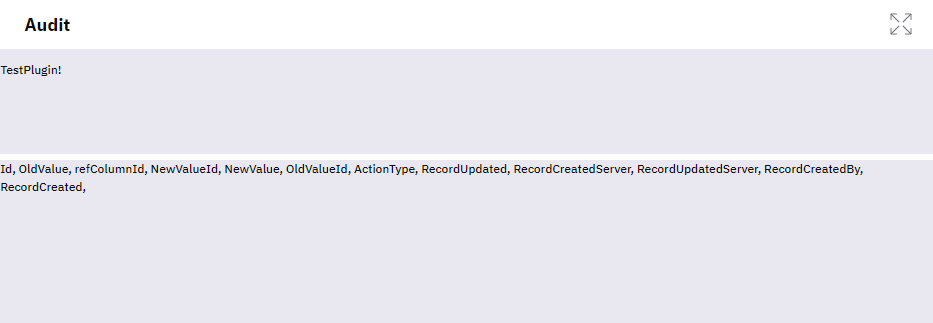
return <div>TestPlugin!</div>;
}
onSessionRefreshed() {
}
initialize(xmlAttributes: { [p: string]: string }): void {
}
}
As you can see the plugin implements interface IScreenPlugin and all its fields and methods.
The field $type_IScreenPlugin is not explicitly defined in the interface but it is needed to clearly show that the objects created from this class implement the interface.
requestSessionRefresh is a method you can call to refresh the screen (data)
setScreenParameters is a method you can use to set screen parameters
getComponent will be called when rendering the component and what you return here will be used to replace the placeholder widget you added to the screen in the Architect. The input to the method contains data which is model and database data you can use in your component. And the createLocalizer function wihich will create a Localizer more on that later.
onSessionRefreshed is called after the user pushes the Refresh button in the origam application. You can reload the data and update your components from here.
initialize is called after the application starts and the xmlAttributes parameter contains among other things the properties that you can model in architect and use them to configure the plugin.
Now we can modify the TestSectionPlugin.tsx file created earlier by the python tool. Put this into the file:
import React from "react";
import { ILocalization } from "plugins/interfaces/ILocalization";
import { ISectionPlugin } from "plugins/interfaces/ISectionPlugin";
import { ISectionPluginData } from "plugins/interfaces/ISectionPluginData";
import { ILocalizer } from "plugins/interfaces/ILocalizer";

export default class TestSectionPlugin implements ISectionPlugin {
  $type_ISectionPlugin: 1 = 1;
  id: string = "TestSectionPlugin ";

  getScreenParameters: (() => { [p: string]: string }) | undefined;

  getComponent(data: ISectionPluginData, , createLocalizer: (localizations: ILocalization[]) => ILocalizer): JSX.Element {
    return <div>{data.dataView.properties.map(prop => prop.id+", ")}</div>;
  }

  onSessionRefreshed() {
  }

  initialize(xmlAttributes: { [p: string]: string }): void {
  }
}
The TestSectionPlugin implements IsectionPlugin interface. As you can see this plugin cannot refresh the screen or set screen parameters but it can get the parameters and their values.
Finaly we have to register the plugins in the C:\OrigamPlugins\TestPlugins\PluginRegistration.ts file so that the plugin classes can be recognized as plugins and found by the application. This file was created by the python tool earlier but we have added another plugin so we have to update the file. Make sure the content of the file looks like this:
import { TestSectionPlugin } from "plugins/implementations/TestPlugins/src/TestSectionPlugin";
import { TestScreenPlugin } from "plugins/implementations/TestPlugins/src/TestScreenPlugin";
import { registerPlugin } from "plugins/tools/PluginLibrary";

export function registerPlugins() {
  registerPlugin("TestSectionPlugin", () => new TestSectionPlugin());
  registerPlugin("TestScreenPlugin", () => new TestScreenPlugin());
}
Next run the python tool again. Now you will see more options. Select 1 Copy from plugin repository to Origam repository and choose your plugin name. This will copy the generated files to the origam repository and update dependencies in package.json. You can see what exactly changed in git.
When we open audit view on any page:
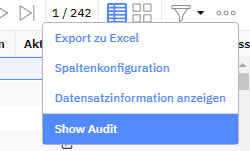
We should see this:
Localization
to use localization features you have to create an instance of Localizer class by calling the createLocalizer function in the getComponenet method. The localizations array which is a parameter in the createLocalizer should be placed in a separate file next to the plugin file. The localization file for the TestScreenPlugin would be named TestScreenPluginLocalization.ts. The file should contain a constant named localizations in the following format:
export const localizations = [
  {
    locale: "de",
    translations: {
      day: "Tag",
    }
  },
  {
    locale: "cs-CZ",
    translations: {
      day: "Den",
    }
  },
  {
    locale: "en-US",
    translations: {
      day: "Day",
    }
  },
]
To localize a string inside your plugin call translate(key: string, parameters?: {[key: string]: any})
method of the localizer where the key is the key from the localization file and parameters is an object with named parameters. The localization strings are interpreted using library called messageformat. Look here to learn how you can parametrize your strings. A nice debug tool is also available here: Online ICU Message Editor
When Can You Reference From the Plugin
The interfaces you should be using when developoing the plugins are at origam\frontend-html\src\plugins\interfaces. Some abstract classes implementing the plugin ineterfaces are at origam\frontend-html\src\plugins'components. If you reference anything else from the Origam code you may find that your dependency has changed and your code is broken the next time you build the client with your plugin. So be careful about that.
Notes
If you think the plugin you are making might be used inside of TabControl, make sure to give the plugin componet’s tag this css style: flex-grow:1; If you don’t do that the plugin might not be hidden when it’s tab is deactivated leading to several tab contents to be rendered at the same time.