The purpose of this article is to prepare you for your own development in ORIGAM, i.e. to prepare all the necessary tools to model your own application. If you want to develop the platform itself, here are the instructions on GitHub.
New here? If you’re still deciding whether ORIGAM is the right fit for you, check out the previous chapter on the Introduction.
To start developing with ORIGAM, you’ll need to get prepared. In this article, you’ll learn what hardware and software are required. But first, let’s review the foundational knowledge needed to work with ORIGAM.
The minimum knowledge requirements include:
- Basic understanding of databases
- Basic knowledge of SQL
- Fundamentals of XML, XSLT, XPath
If you’re unfamiliar with these topics, it’s important to get up to speed fairly soon. The same goes for working with Docker and Git. You can find more details in this article.
Basic Requirements
Here’s what you’ll need:
- PC or Mac: At least 16 GB of RAM (32 GB recommended) and a minimum of 256 GB disk space (512 GB preferred).
- Operating System: MS Windows, macOS, or Linux with virtual MS Windows.
- ORIGAM Architect: The integrated development environment (IDE) used to model ORIGAM applications.
- Docker Desktop: Runs the application, database, and web server in Docker containers.
- Web Browser: Use Google Chrome or another modern browser for the client web application.
Additional Tools
Here are some optional tools that can improve your development experience:
Data Management
Consider using Azure Data Studio for easier database management. It works with MS SQL Server and PostgreSQL, and runs on Windows, macOS, and Linux. For more details, check out this article. If you’re on Windows, MS SQL Server Management Studio (SSMS) is another good option.
Version Tracking and Collaboration
For advanced version control and collaboration, we recommend Git along with platforms like GitHub, GitLab, or BitBucket.
Code Editing
Although you won’t need to write code initially, tools like MS Visual Studio Code, MS Visual Studio, or Notepad++ will be helpful later when developing custom modules.
Local Development
Here’s our recommended setup for local development:
- PC with MS Windows or Mac with macOS
- ORIGAM Architect desktop app
- Docker container 1: ORIGAM Server
- Docker container 2: Database server
- Web Browser
This is our ideal configuration. However, if you already have a local database server, you can skip installing a new one in Docker.
Installation Steps
ORIGAM Architect
Install the latest stable release of ORIGAM Architect.
-
Windows Users: Download here (Assets / OrigamSetup.msi) and install it.
-
Mac Users: Since ORIGAM Architect is a Windows desktop app, you’ll need a virtual machine. Options include Parallels Desktop or Oracle VM VirtualBox (note: VirtualBox does not support ARM/Apple Silicon). Once the virtual machine is set up, follow the same instructions as Windows users.
Docker
Using Docker containers is optional but highly recommended, as it simplifies many processes.
If you don’t have Docker installed, download and install Docker Desktop from here.
Are you new to Docker? Check out our guide or refer to the Docker documentation.
Database Server
ORIGAM natively supports two database servers: MS SQL and PostgreSQL.
Not sure which to pick? Choose MS SQL, especially if you’re on Windows. PostgreSQL is a better option for macOS, particularly if you’re using an Apple Silicon CPU. You can find a helpful comparison here.
For this guide, we’ll use MS SQL. To install it, follow this guide.
Once you download or create a Docker database image, create a container from it and run it. Then you’ll be ready to start your first ORIGAM project.
ORIGAM Server
The ORIGAM Server must match the version of ORIGAM Architect you’ve installed. The Docker image pull commands can be found on GitHub:
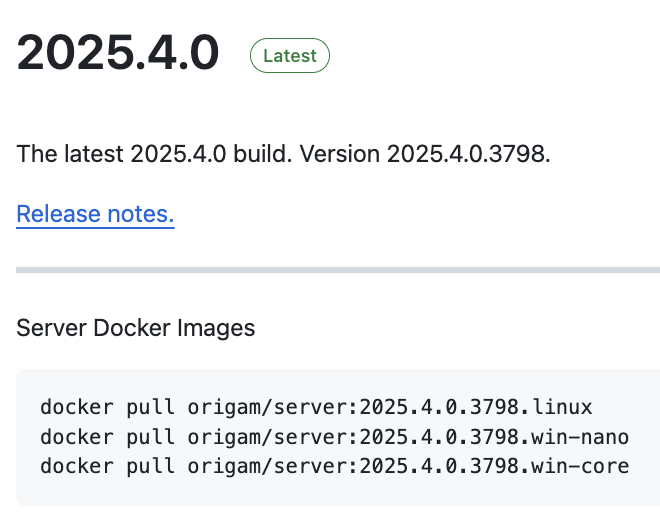
The Architect and Server builds must match exactly, otherwise problems may arise. For example, if you have Server version 2025.4.0.3798, you also need Architect version 2025.4.0.3798, and version 2025.4.0.3799, for example, may not work properly.
For now, just download the server image. You’ll learn how to launch the ORIGAM Server as part of your first project in this tutorial.
Additional Tools
Feel free to download optional tools like Azure Data Studio, Visual Studio Code, or Git. All are available for both Windows and Mac.
~
Once you’ve installed all the required components—including ORIGAM Architect, the Server, and a database server—you’re ready to begin local development with the ORIGAM platform! ![]()
Ready to embark on your first project? Jump to the next chapter on Work environment!