This article helps you to create, step by step, a simple application using the ORIGAM Architect and then run it in the browser.
New here? In order to create any application, you need to have a local development environment running. If you haven’t installed it yet, please see the chapter Getting ready for your own work with the ORIGAM platform.
The general approach to creating a specification and what it should contain is described in the chapter Development process, where each step is explained in detail. Here we apply this process to an example of creating a specific application.
This sample application demonstrates how to create applications using ORIGAM, following the recommended procedure. The design is structured in increasing levels of complexity, guiding the user from a simple version to more advanced stages. This text covers a Level 1 app, with additional levels available in the chapter [Advancing your app] (TBD).
Ready to start? Let’s go and create a simple Task Management application for an example customer.
Assignment
Here are the outputs from meetings with the customer – steps 1, 2, and 4 in the process:
Problem / idea
We are a small team of five people and we need to manage the tasks that arise in our daily activities.
At first, everyone was responsible for capturing and completing their own tasks, but that didn’t work well.
Later, we tried using a shared spreadsheet to manage tasks, but even that became ineffective after some time.
We then explored available online solutions, but most were overly complex, expensive, and didn’t match our needs or preferences. Additionally, we were concerned about data ownership and control.
To keep the costs low, we would like to find a vendor using a low-code/no-code tool who can develop the application for us quickly and affordably. If successful, we’d like to work with the same provider on future systems as well.
Are you not a provider but want to develop an app for your own company?
Then just modify the paragraph above to the following form:
To make this path economically viable, we would like to use some low-code/no-code tool and develop and run the application in-house. We would then like to use the skills we have acquired in this way to create other systems that we will need for our activities in the future.
Requirements
At the moment, we’re happy with a very simple application, but as our team and workload grow, we’ll need to gradually add new features.
Currently, we need the following:
- Users can create, edit, assign, and delete tasks.
- Users can easily view all tasks or only those assigned to them.
- Each task has a name, description, deadline, and is assigned to a responsible team member.
- Each task also has a status and a priority.
- Priorities and statuses are defined by users as part of the application.
Supporting documents
- Table with existing tasks
Other specifications
- There are two user types – regular users and administrators. Administrators can do everything regular users can, plus manage user accounts.
- The app will be in one language only.
- The app will run on a local server.
Design
This corresponds to step 3 in the process – defining the application structure using an entity-relationship diagram (ERD) and creating basic screen wireframes.
Entity relationship diagram
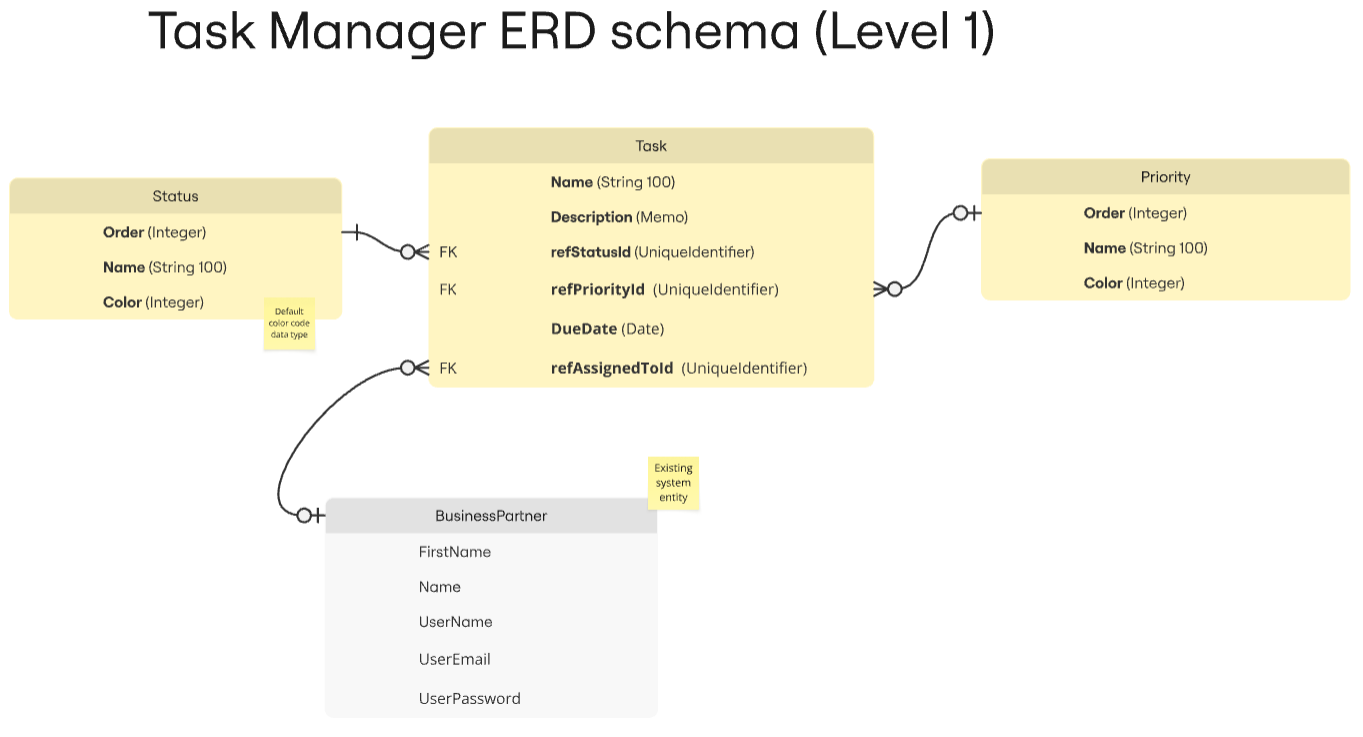
Note:
Some fields of the Task entity have “ref” at the beginning and “Id” at the end of their names (e.g. refStatusId). This is our naming convention for fields carrying foreign keys. This topic will be discussed later.
Screen wireframes
Once you are comfortable using ORIGAM, it often makes sense to prototype directly in ORIGAM. This not only speeds up development but also allows the customer to see the real application environment from the very beginning.
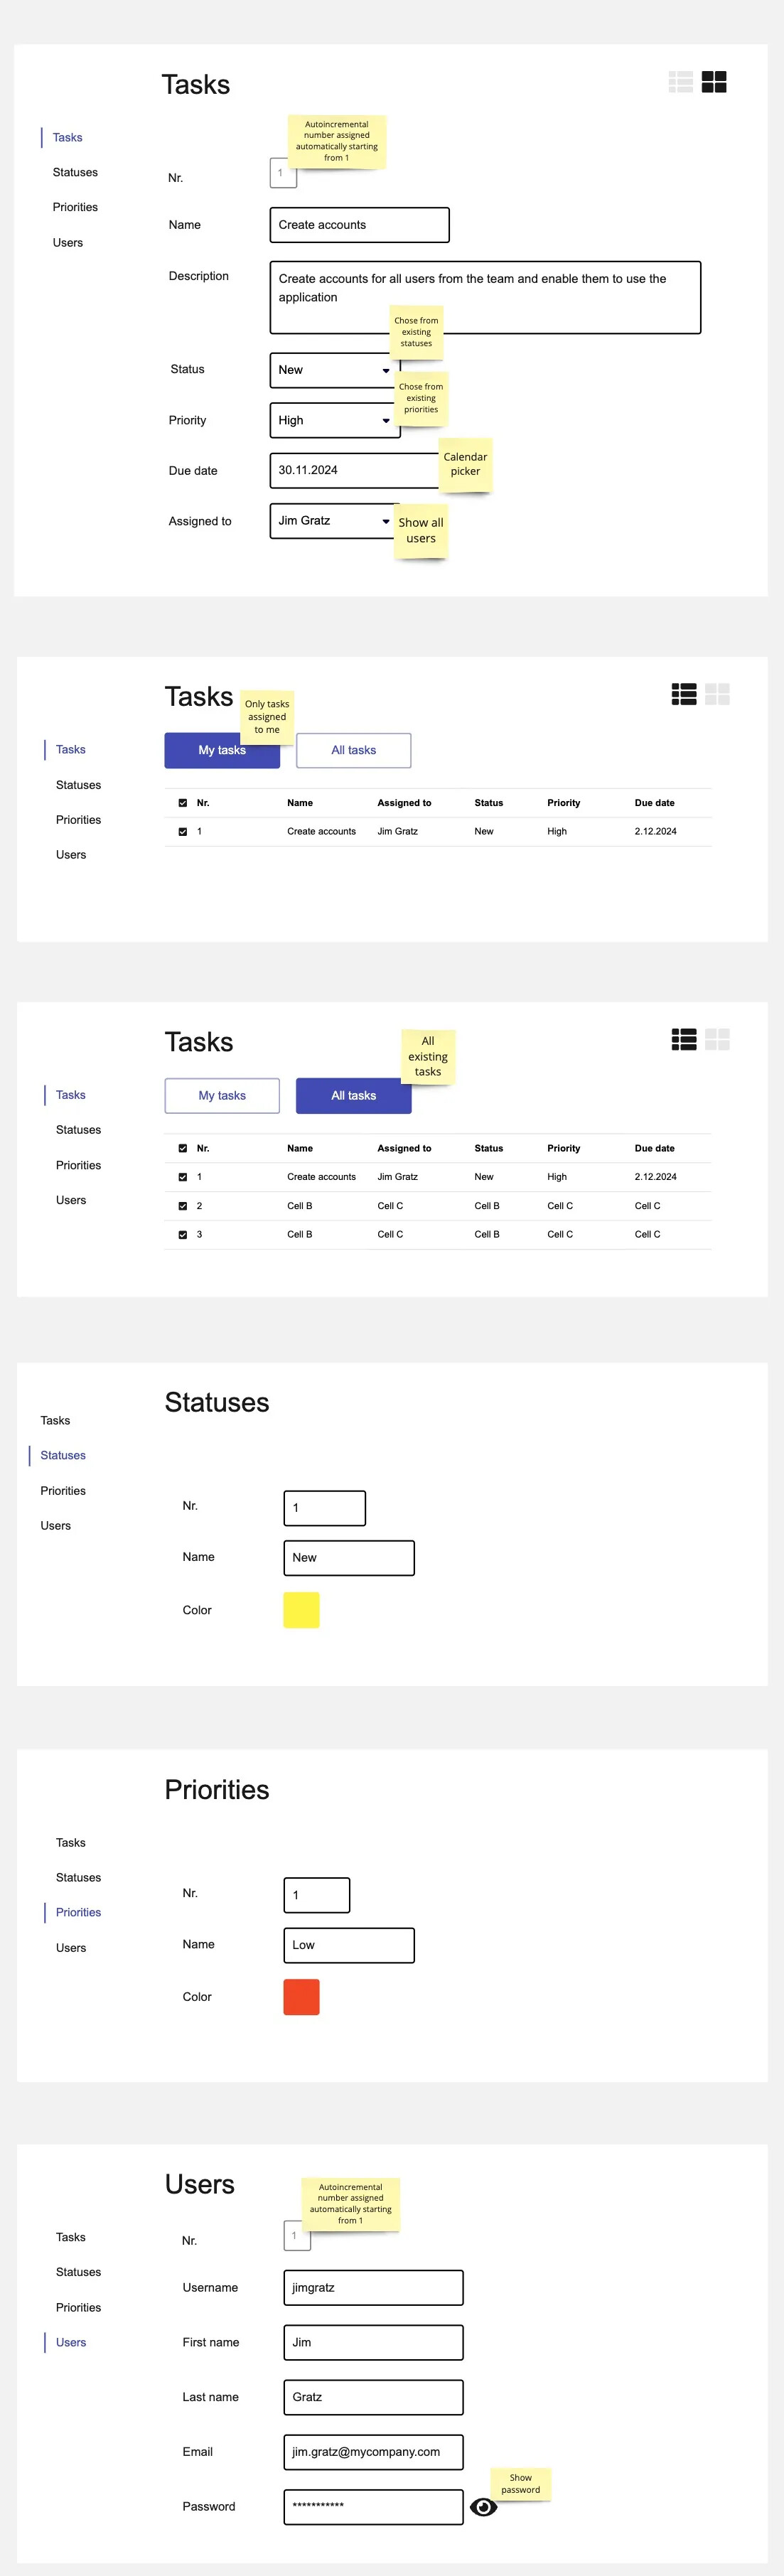
Note: The “Users” screen in the main menu will be visible only to users with the administrator (Super User) role.
Development
Application development in ORIGAM Architect corresponds to steps 5 and 6 of the process.
Here are the high-level steps with links to detailed instructions in separate articles:
-
Run DB server in Docker, this is the first necessary step.
-
Create new Project in Architect, including Git repo. Call it for example “TaskManager”.
-
Install Git and check the initial commit to confirm the project was created correctly.
-
Run the ORIGAM Server to start working with the client application.
-
Check empty client application to view the default content.
-
Check your new database to see the initial data structures.
-
Create all entities and fields as shown in the ERD design above.
Create the entities
Status,Task, andPriorityand define their fields such asName,Order, orColorwith appropriate data types likeIntegerorStringand appropriate DataLength for String. Field holding color, when using the color picker, needs to beIntegertype. All fields and their types are specified in the ERD schema above.Be sure to set the
Captionproperty, especially for fields intended for foreign keys with “ref…Id” in the name or with compound names (likeDueDate). For example, forrefAssignedToId, set the caption toAssigned to.The entity
BusinessPartneralready exists under thePartnerManagementpackage. It is a system entity representing the user in ORIGAM, so you don’t need to create it.In case you are not familiar with relational databases, you can watch this video.
-
Bind entities manually using Foreign keys to create relationships.
Link all foreign key fields in
Task(refStatusId,refPriorityId,refAssignedToId) to theIdfields of their respective entities (Status,Priority,BusinessPartner). -
Run all deployment scripts to apply database changes.
The script generator will produce four scripts — three for entity creation and several for foreign keys. Run them all in the correct order — from the lowest number onwards one by one.
-
Check your updated database to verify the new entities.
-
Create and set up Lookups for all dropdown menus.
Create Lookups for
PriorityandStatus, which will be used in theTaskscreen. Also create a Lookup for users using theBusinessPartnerentity in thePartnerManagementpackage. SetDisplayMembertoName;First Name. Make sureNameandFirstNamefields are included in the Data Structure.Assign your Lookups to the
DefaultLookupproperty of therefPriorityId,refStatusId, andrefAssignedToIdfields.Use the Action to speed things up or define Lookups manually for deeper understanding.
-
Create Screens – these form the core of your user interface.
Use the wireframes as reference and create screens for
Status,Priority, andTask. TheUsersscreen already exists and is accessible via Settings / Users & Security / Users or Add User.In
PriorityandStatusscreen sections, change theColorfield to useColorPickertype. Remove and re-add it with the correct type if necessary.Optionally, adjust screen layout, set the
Descriptionfield inTaskas a multiline textbox, etc. -
Edit application Menu to make screens accessible to users.
Use the Create Menu Item Action on your Screens to create new Menu Items for
Priorities,Statuses, andTasks, and corresponding Application RolesFRM_Priority,FRM_Status, andFRM_Task.Execute all related deployment scripts and use the
Orderproperty to sort all your Menu Items. -
Create a new User Role and User to manage access.
Create a role like
StandardUser, assign it your new Application Roles, and add the defaultFRM_UserProfilerole so users can edit their profile.Create a user, assign the
StandardUserrole, and activate it. Now you should have both an admin (SuperUser) and a regular user.After restarting the ORIGAM Server, log in as the
StandardUserto see your new menu items. -
Fill in and configure dropdown menus for better usability.
Populate
Priorities(e.g.Low,Mid,High) andStatuses(e.g.New,In Progress,Done), includingColorandOrder.Order the dropdowns and set the default status value to
New.Filter items in the
Assigned tomenu to exclude system users (filter for those with email filled in). -
Set up record ordering to make sorting easier.
Set the
OrderMemberproperty in bothStatusandPriorityScreens and hide theOrderfield in the interface. -
1. Fine-tune some details and shorten the date format of the field
Due datein the Task form, as well as order the fields in all of your forms. -
Save new version in Git to track your progress.
-
Set up the client application for a better user experience.
You can, for example, change the language, set a custom logo, or extend session expiration.
Check your application to make sure all changes were applied.
-
Analyze and fix errors to understand basic troubleshooting in Docker.
Even if everything worked fine, it’s useful to learn how to handle issues — you’ll need it eventually.
-
Create new model version to prepare for the next development phase.
Create version
1.0.1and set it as the current version. -
Delete all training projects to clean up unused resources.
You may not need this yet, but it’s good to know how.
-
Upgrade the platform to get the latest features.
Even if you’re on the latest version now, learning the upgrade process is recommended.
-
Start using the client application, play around with it, and refine the details.
Launch
Until now, you’ve been running your application locally. At some point, you’ll need to deploy it to another environment for production use and access by other users. This is a key moment where you test the completeness and deployability of your model. This corresponds to step 7 in the development process and includes any further development.
~
If you have successfully created your first application, you can publish it now. To do so, continue to the next chapter Publishing your application (TBD).