This guide will walk you through the process of editing the user menu in the client application.
[!success]- Prerequisites for further work
To proceed, ensure you meet the following five basic prerequisites:
- Running a database server
- Running ORIGAM Server
- A project created in ORIGAM Architect
- A screen created
- The client application running in your browser
Once these prerequisites are set up, log into the client application using the username and password you created during the project setup.
Default Menu Items
A fresh client application comes with a few items already present in the user menu:
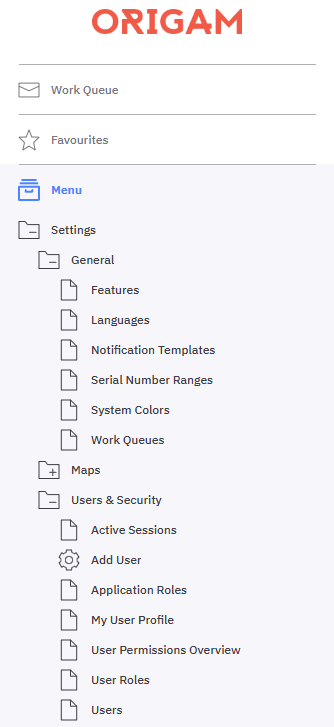
This is the default state, and you are not permitted to make changes to it. However, if you wish to hide the entire Settings folder or its individual parts, you must do so via role setup.
Creating custom Menu Items
You can add custom items to the Menu manually or with Action and you can do it for screens, for sequential workflows and other model items. Here, we’ll primarily show you how to work with screens, but the same approach applies to a sequential workflow as well.
Menu Item with Action
If you use Action to create a Menu Item, you also create an Application Role to access it.
To do so, run the Action Create Menu Item on the Screen (or Workflow) you want to add to your Menu:
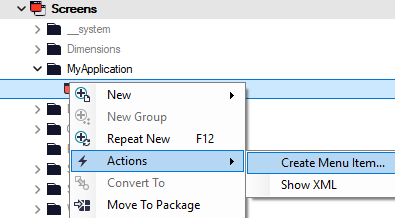
Before using the new Application Role and Menu Item, remember executing the generated deployment script first.
Manual Procedure
To add custom items to the menu manually, go to the Model Browser and navigate to User Interface / Menu. Right-click on the Menu and select New / Screen reference (or Sequential Workflow Reference):
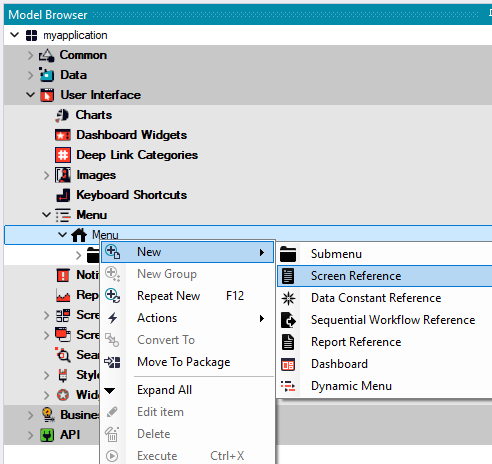
In the screen reference details, you must fill in at least the following required fields:
Name: The name of the Menu Item in the model.DisplayName: The title of the Menu Item that users will see in the menu.Screen: The name of the screen that this Menu Item will open.Roles: The roles that will have access to this Menu Item. This can be one role, multiple roles separated by a semicolon, or all roles using the “*” symbol. If you have not yet created an Application Role to access your new Memu Item, you need to create and deploy it first.
There are additional fields that may be useful:
Order: This field contains a number, which determines the order in which the Menu Items will be sorted (from lowest to highest).MenuIcon: The icon displayed alongside the Menu Item.
There are many more settings available, but this tutorial will not go into those details.
Save the screen reference, and your new Menu Item will be created.
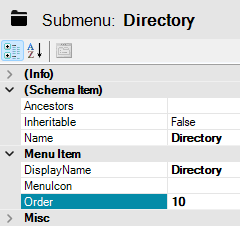
Creating a submenu
A submenu is essentially a folder that contains multiple Menu Items. For example, a Directory submenu may contain Menu Items for Providers, Suppliers, Partners, etc.
The process for creating a submenu is the same as adding a Menu Item, except instead of selecting New Screen Reference, you choose New Submenu.
In the submenu details, you only need to fill in the Name, DisplayName, and optionally modify the Order field:
Menu in the client application
Once you’ve created all your Menu and Submenu Items, restart the server, reload your browser, and you’ll see the changes reflected in the client application, as shown here:
