This guide demonstrates how some adjustments to the client application can be realized in the platform.
[!success]- Prerequisites for further work
To follow along, you must meet the following prerequisites:
- Running database server
- Running ORIGAM Server
- Project created in ORIGAM Architect
- Entity with fields created
- Running client application in your browser
Once these prerequisites are set up, log into the client application using the username and password you created during the project setup.
Configuration files
Most of the settings related to the client application can be found in the
AppSettings.json configuration file located in the ORIGAM Server root directory or in the Linux Docker container files in home/origam/HTML5/appsettings.json:
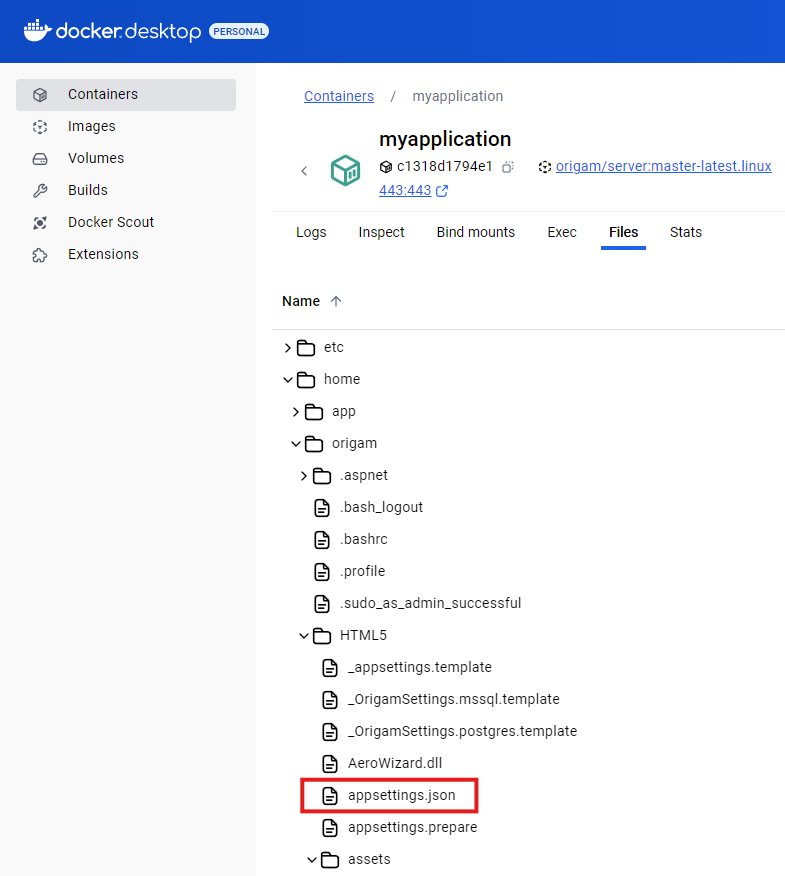
In a Windows container the path is similar:
C:\home\origam\HTML5\appsettings.json
The content of this file defines the ORIGAM Server behavior in various areas and includes also some settings related to the client application. Complete list and description of all the settings available is in the documentation. A complete source file you can see on Github.
Beside the AppSettings file there is also another XML configuration file - OrigamSettings.config. This file is used by the ORIGAM Server as well as by the Architect (it uses a different instance of it) and it also contains some settings used in the client application.
This file can be found in
home/origam/HTML5/OrigamSetting.config (Linux) or C:\home\origam\HTML5\OrigamSetting.config (Windows).
If you want to change any variable located in these two files for your Docker container you have two options:
- Build your own Docker image with custom settings
- Set Docker environment variables and map directories for your container
Building of your own Docker image requires knowledge of Bash (for Linux image) or Powershell (for Windows image) and also Docker file modification. It is usually nor necessary but if you want to go that way then take a look at this guide.
Environment setting
In this article we will show the second and much easier way of configuring the environment variables for your Docker container running the ORIGAM Server.
When using this approach you just need to change the .env configuration file which is located in a local Docker subfolder you find in the folder of your project, for example here:
c:\OrigamProjects\MyApplication\Docker\myapplication.env
Settings in this configuration file will be used preferentially, so if you define your own values, they will be used regardless of the default values specified in the appsettings.json or origamsettings.config files.
To change any variable you need to add a new line to your Docker .env file in a format that slightly differs for both configuration files.
AppSettings.json
The format is element__parameter=value. The separator __ used here are two underscores signs.
Example from documentation:

This parameter will have the following record in the .env file:
IdentityGuiConfig__AllowPasswordReset=true
This setting, for example, will allow the users to reset their password and provide a link for it on the login screen.
OrigamSettings.config
The format here is OrigamSettings__parameter=value. So it is actually the same format as in the AppSettings.json file, but the name of the element here is always “OrigamSettings”.
Example from documentation:
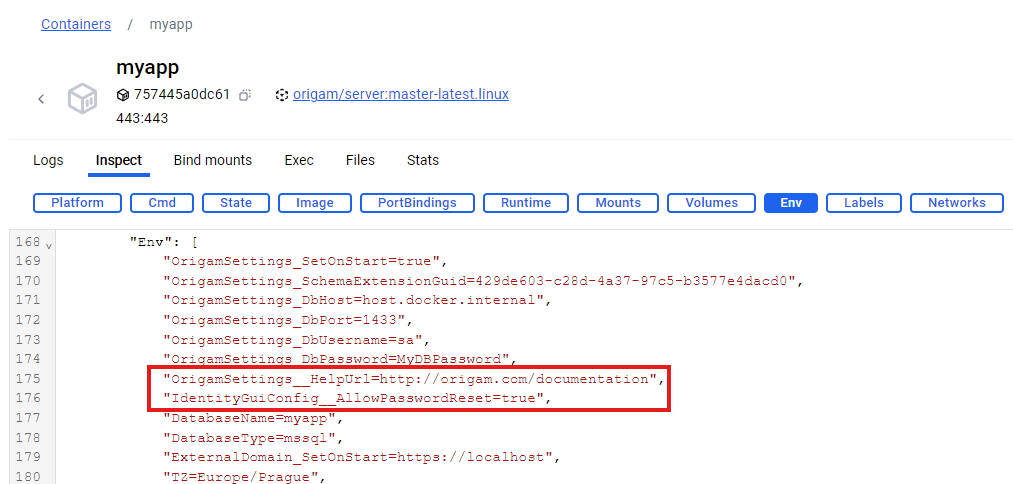
Configuration
HelpUrl
If specified the web application user menu contains menu itemHelpleading to the specified url. The default value ishttp://origam.com/doc.
This parameter will have the following record in the .env file:
OrigamSettings__HelpUrl=http://origam.com/documentation.
In addition to that there is also database connection configuration:
OrigamSettings__DataConnectionString=Data Source=host.docker.internal,1433;Initial Catalog=MyApplication;Integrated Security=False;User ID=MyUsername;Password=MyPassword;Pooling=True;Encrypt=False
Anytime you change the Docker .env file you need to restart it in order that your changes take effect.
Directory mapping
In some cases, beside changing the .env file you will also need to change the Docker command (.cmd) file as well. This file is located in the same directory as the .env file and we will use it to map local and server directories.
For example this line in the .cmd file:
-v "c:\OrigamProjects\MyApplication\customAssets":/home/origam/projectData/customAssets
means that the folder c:\OrigamProjects\MyApplication\customAssets will mirror in the server folder /home/origam/projectData/customAssets.
After changing the .cmd file you need to delete the entire Docker container and create it again running the cmd file. Only then the changes will take effect. More on that here.
To verify that everything works fine you can check your Docker container environment variables directly in Docker:
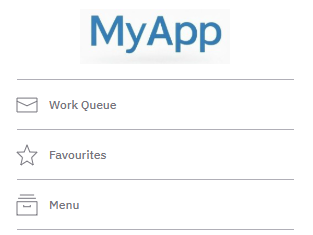
Finally you can see the effect in the client application, for example here:

Client Application settings
In this tutorial we will demonstrate how to setup the following topics:
- Application language
- Application logo
- Menu item icons
- User password
- Login cookie
Application language
The default application language, including number and date formats, is determined by the server’s operating system. In addition to English, we also support German (both de-DE and de-CH) and Czech.
To change the language from English to Czech, for example, add the following lines to your Docker .env file:
LanguageConfig__Default=cs-CZ
LanguageConfig__Allowed__0__Culture=cs-CZ
LanguageConfig__Allowed__0__Caption=Česky
Additionally, you need to set the localization folder:
Linux:
OrigamSettings__LocalizationFolder=/home/origam/projectData/l10n
Windows:
OrigamSettings__LocalizationFolder=C:\\home\\origam\\projectData\\l10n
The next step is to map the local localization folder of your project to the server’s file system in the Docker .cmd file. By default, this folder is located in your project directory, within a subfolder called l10n. For example, it might be located at c:\OrigamProjects\MyApplication\l10n.
In this case, the mapping in the .cmd file would look like this:
-v "c:\OrigamProjects\MyApplication\l10n":/home/origam/projectData/l10n ^
Once these settings are configured, simply regenerate and run your Docker container, and the application will switch to the new language.
Application logo
By default, every new ORIGAM application displays the platform’s logo in the top-left corner:

If you’d like to change the logo, you need to copy your logo file into the customAssets folder in your project’s directory. For example, the path on your local machine might look like this:
c:\OrigamProjects\MyApplication\customAssets
Next you need to map the directory on your local machine to the Server directory in your Docker container. To do this, modify the Docker .env configuration file and set the following variables:
CustomAssetsConfig__PathToCustomAssetsFolder=/home/origam/projectData/customAssets
CustomAssetsConfig__RouteToCustomAssetsFolder=/customAssets
CustomAssetsConfig__IdentityGuiLogoUrl=/customAssets/Logo1.jpg
CustomAssetsConfig__Html5ClientLogoUrl=/customAssets/Logo2.jpg
This will specify the HTML route to the customAssets directory and also where to find the logo files within the Docker file system.
Logo1 is displayed on the login screen, while Logo2 appears at the top of the main menu in the client application. If you prefer to use a single logo, the logo file names should be identical in both parameters.
To enable this functionality, you must also map the local customAssets folder on your computer to the corresponding folder in the Docker container by modifying the Docker .cmd file. For instance, you can add the following parameter:
-v "c:\OrigamProjects\MyApplication\customAssets":/home/origam/projectData/customAssets
Now, copy your logo file(s) — either a bitmap with a height of 96px and a width of 200px, or a vector SVG file (ensure the file name in the configuration is changed to .svg) — to the local customAssets folder in your project. Then, regenerate the Docker container with the new settings by running the .cmd file and enjoy your custom logo:
Menu item icons
By default, the icons for the items in the menu appear as follows:
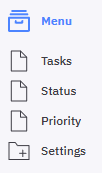
If you’d like to customize the icons, follow these steps:
-
Copy your files
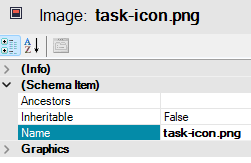
Copy all the icon files you want to use into the local customAssets folder in your project’s folder. The path for such a file might be
c:\OrigamProjects\MyApplication\customAssets\task-icon.png. -
Set up custom images
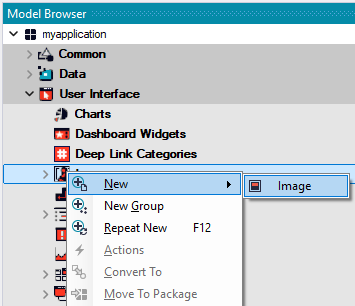
In the Model Browser, go to
User Interface/Imagesand create a new Image:In the image details, enter the file name in the Image Name property and save it:
-
Set up your icon
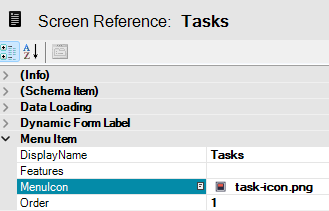
Go to the Model Browser, under
User Interface/Menu, and edit the menu item where you want your custom icon to appear. In the ScreenReference property, select your Image and save it: -
Set up Docker configuration
Ensure the local and server customAssets folders are properly mapped in the Docker .env configuration file, as shown in this example:
-v "c:\OrigamProjects\MyApplication\customAssets":/home/origam/projectData/customAssets
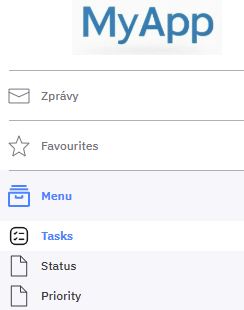
Restart your Docker container, reload your application, and your custom icon will be visible:
Password Settings
The parameters you can configure for a user password are as follows:
-
RequireDigit: If set totrue, the user password must contain at least one digit. -
RequiredLength: Specifies the minimum length for the user password. -
RequireNonAlphanumeric: If set totrue, the user password must include at least one non-alphanumeric character. -
RequireUppercase,RequireLowercase
Example configuration in the AppSettings.jsou file:
"PasswordConfig": {
     "RequireDigit": "true",
     "RequiredLength": "10",
     "RequireNonAlphanumeric": "false",
     "RequireUppercase": "true",
     "RequireLowercase": "true"
    },
If you wish to set up your application this way, add the following lines to your Docker .env file:
PasswordConfig__RequireDigit=true
PasswordConfig__RequiredLength=10
PasswordConfig__RequireUppercase=true
PasswordConfig__RequireLowercase=true
If you want to enable a password reset link on the client app login screen add also this line to the .env file:
IdentityGuiConfig__AllowPasswordReset=true
After restarting the container, the user password requirements and other options will be updated according to your settings.
For full details on password configuration, refer to the documentation.
Login cookie
If you’d like to change the login cookie expiration time, simply add a new key CookieExpirationMinutes to the IdentityServerConfig section in the AppSettings.jsou file:
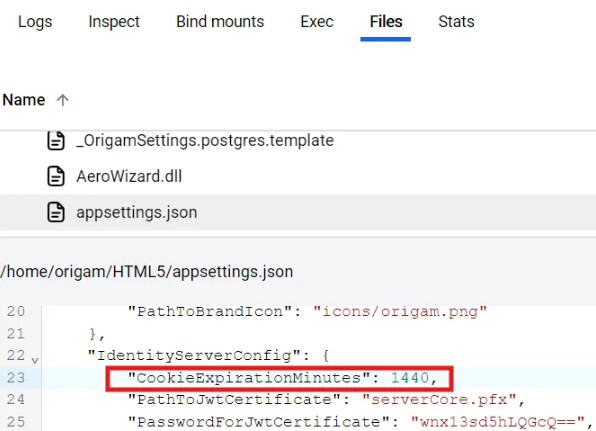
Alternatively, update the .env Docker container by adding this line:
IdentityServerConfig__CookieExpirationMinutes=1440
The setting in this example will require a new login after 1440 minutes (24 hours). As with any change, you’ll need to restart your server for the change to take effect.