This guide will demonstrate how to filter the list of items displayed in a drop-down menu. In the last chapter is will also demonstrate how to filter the data viewed in screens.
[!success]- Prerequisites for further work
To follow along, you must meet the following prerequisites:
- Running database server
- Running ORIGAM Server
- Project created in ORIGAM Architect
- Entities and fields created
- Lookups created
- User screens created
- Running client application in your browser
Once these prerequisites are set up, log into the client application using the username and password you created during the project setup.
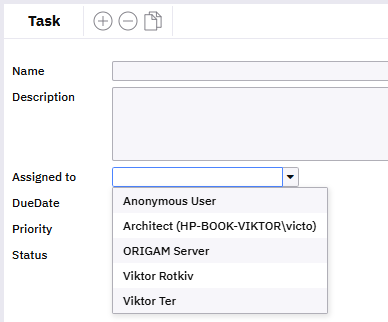
In certain cases, you may need to filter the items in your drop-down menu to display a specific selection of records.
For instance, in a Task Manager application, you need to assign tasks to responsible individuals using a drop-down menu in a field named Assigned to. However, there are by default some system accounts visible in the menu that you need to filter out:
Similarly, you may need to filter only certain items from the existing data in your screens, such as only completed tasks.
To achieve this, you’ll work with Filters, Filter Sets, Data Structures, and Lookups (used in drop-down menus).
Basics
The basic thing to understand here is that Filters are defined at the database entity level. You create each filter for a given entity once and then you can use it repeatedly in different parts of the model. This means you don’t have to create the same filter multiple times, just once. So please remember that filters are part of database entities. You can think of them as a kind of “property” of a database entity.
Another thing is how to use these filters. You do this using a FilterSet in a DataStructure, where you add the necessary filters. So, for example, if you want to filter data in a screen, you create a filter set in the data structure on which the screen section in that screen is built and add all the filters you need for your purpose to it.
The final utilisation of filters is then at the ScreenReference element level, where you use the Method property to determine which filter set should be used when loading the screen via the user menu. Here, for example, you can specify that for a certain user role, the screen will be loaded in one way (using filter set 1) and for another user with a different role in another way (according to filter set 2).
This hierarchy—database entity/filter set in the data structure/screen reference—needs to be well understood.
Filters
Default Filters
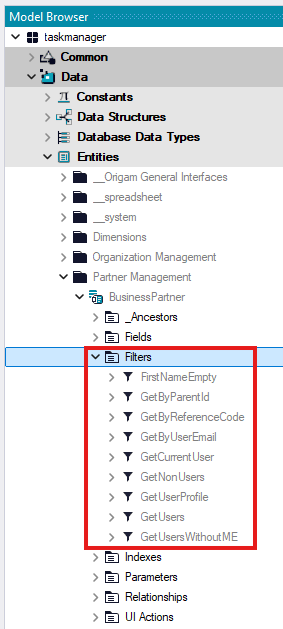
There are several default filters already defined in the default ORIGAM model. For example, users are located in the Business Partner entity under the Partner Management model part, and they come with the following default Filters:
Custom Filters
To create your own Filters, follow this procedure:
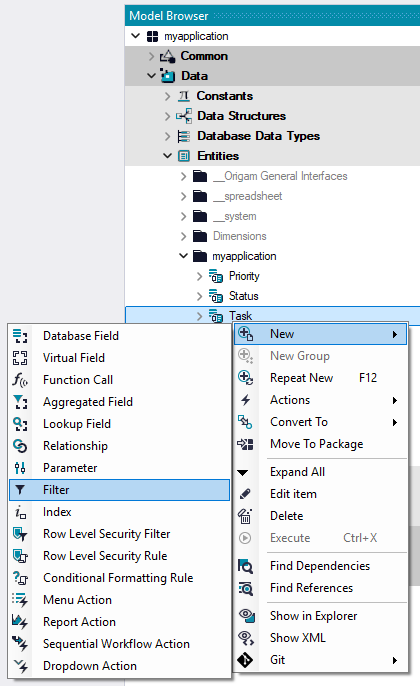
Create a new Filter
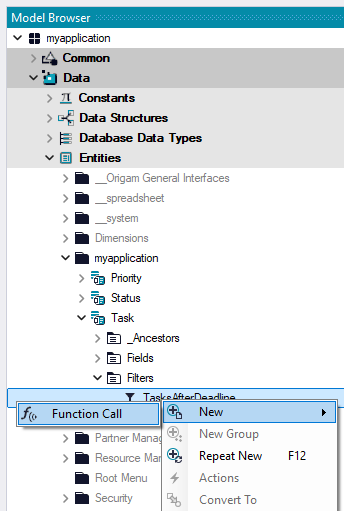
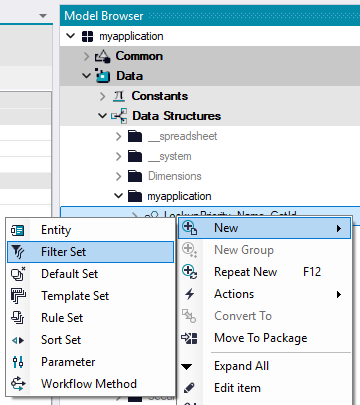
In the Model Browser, go to Data / Entities, under the package folder of your application, right-click on the Entity for which you want to create the Filter and select New / Filter:
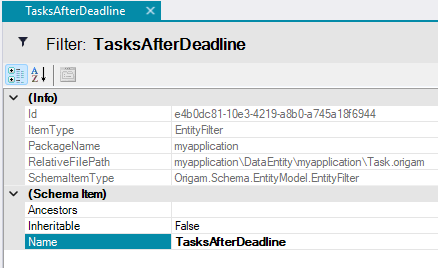
In the Filter details, name the Filter (e.g.,):
Save it.
Add Function(s)
In the Model Browser, right-click on the Filter you just created and select New / Function Call:
Configure Function(s)
In the Function Call properties, provide the Name and select the Function you want to use:

Save it, and expand the Function Call you just created in the Model Browser:
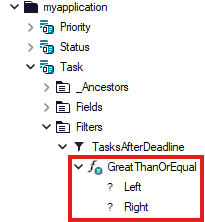
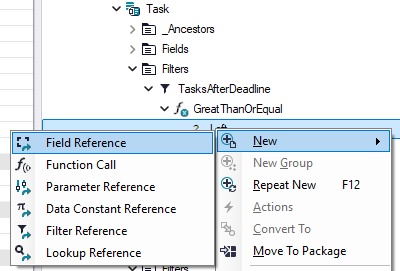
Next, set up the Left and Right parts of the filter condition using different options:
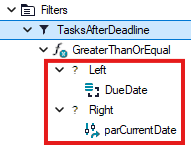
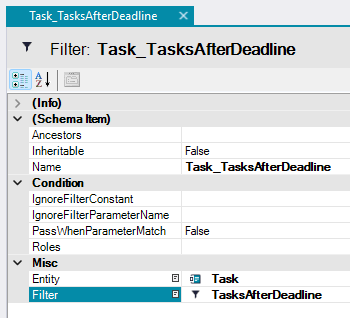
For example, to filter Tasks after the deadline or with a deadline today, set up the following Filter using a system Parameter named parCurrentDate:
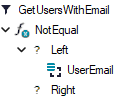
Alternatively, to filter out system Users (those with no email set), use the following Filter:
Custom constant
If you need to filter by a specific value in your data, you can create your own constant (Data / Constants / you package) and then use it in the filter.
For example, if you want to filter only completed tasks, simply create a constant called Status_Done with the value Done and then use it in your filter on the right side.
More details on Filters can be found here.
Filter Sets
Filter Sets are based on Entity Filters, defined in Data Structures, and are used in Lookups when loading data.
To create a Filter Set for a drop-down menu, follow this procedure:
Create a new Filter Set
In the Model Browser, go to Data / Data Structures, under the package folder of your application, right-click on the Lookup Data Structure for which you want to create a Filter Set and select New / Filter Set:
Remember to create the Filter Set for the Data Structure used in the Lookup you want to use in your drop-down menu. Such Data Structure names follow our naming convention and start with
Lookup, e.g.,LookupTask_Name_GetId.
Name your Filter Set
In the Filter Set properties, name your set using the naming convention GetBy + parameter, e.g.:

Save it.
Add Filter(s)
Right-click on your Filter Set and select New / Filter:

Configure Filter(s)
In the Filter Set Filter details, select your Entity and Filter, and the Name will be created automatically. For example:
Save it, and your Filter Set will be ready to use.
Lookup settings
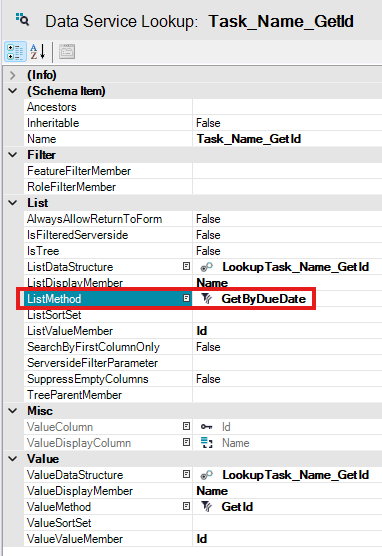
When defining a Filter Set in Lookup Data Structures, you need to configure them in the Lookup details using the ListMethod property. If the Filter Set is properly configured in the Lookup Data Structure, you can select it here. For example:
Save it, and now your Lookup will display only items based on your Filter Set settings.
Identifying the right Data Structure
In some cases, you may not be sure which Data Structure you need to create a Filter Set for. To choose the right Data Structure, follow these steps:
Open the Screen
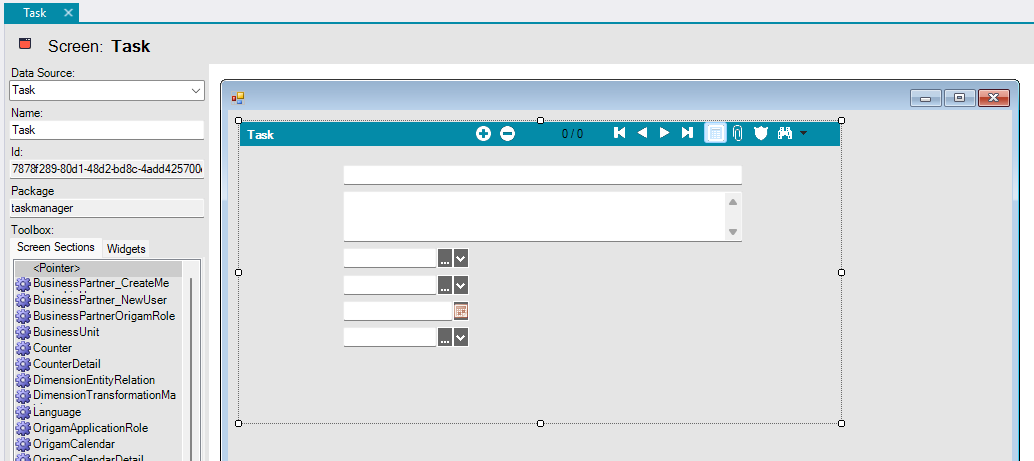
In the Model Browser, go to User Interface / Screens, under the package folder of your application, double-click on the Screen name where the drop-down menu you want to work with is located.
Select the Screen Section
In the Screen editor, select the Screen Section where the drop-down menu you want to edit is located. If there is only one Screen Section in your Screen, the entire block may look like this:
View the Properties
Then, in the right bar of the Architect, switch to the Properties tab:
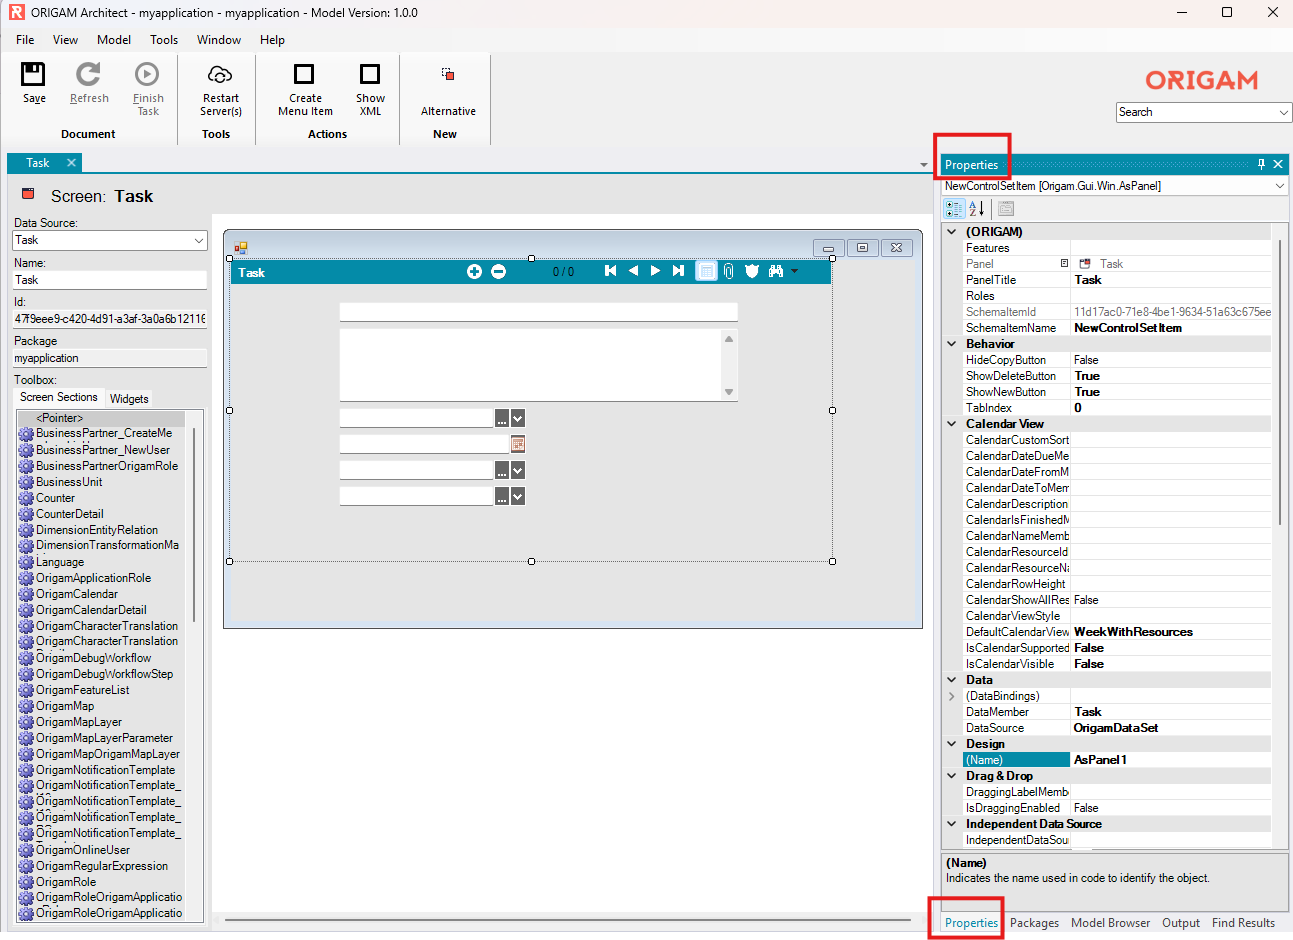
Open the Screen Section
In the Screen Section Properties, double-click on the icon next to the Screen Section (Panel) name:
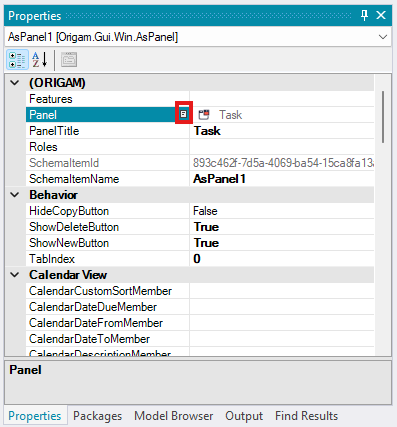
This will open the right Screen Section for editing.
Open the Lookup
Next, in the right bar, go to the Field Properties tab and double-click on the icon next to the DataLookup name:
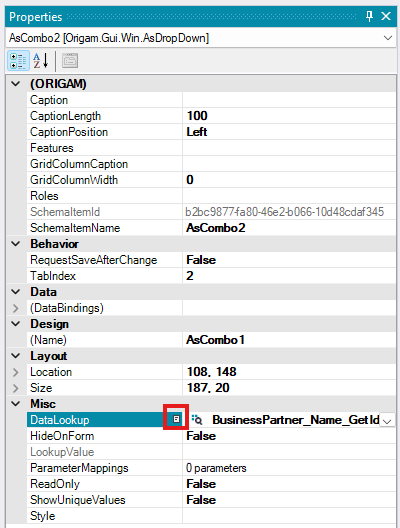
Open the Data Structure
In the Lookup properties, double-click on the icon next to the ListDataStructure name:

Verify the Data Structure
Now you can confirm that you are editing the correct Data Structure used in the drop-down menu you want to edit. This Data Structure, for example, has the following Filter Sets defined:
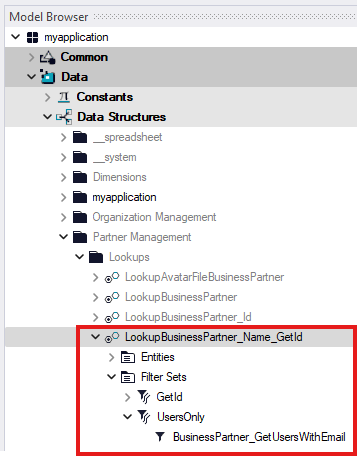
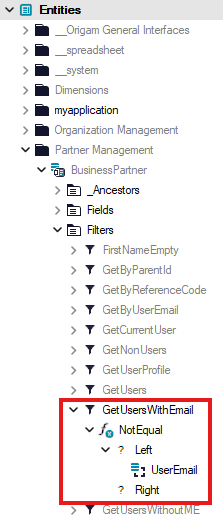
For instance, the Filter Set named UsersOnly is defined to filter out system Users with no email set using the Entity Filter named GetUsersWithEmail that we have already shown:
Filter data in your screens
Another possible use of filters is in user screens when displaying data, whether for editing or just viewing. From the model perspective, this means using filters in screen sections located within screens or tabs.
The creation of filters, filter sets, and their usage in data structures is the same as described above. The difference in this use case is that you set up the filter used in a data structure filter set so that it filters the target entity (used in the data structure).
It may sound complicated, but once you look at the model elements, it should become clearer.
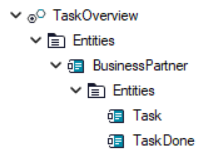
For example, consider a data structure for a screen where we want to view Tasks filtered by their status — in one tab only those with the status Done, and in the other tab those with all other statuses (designated as “not done”).
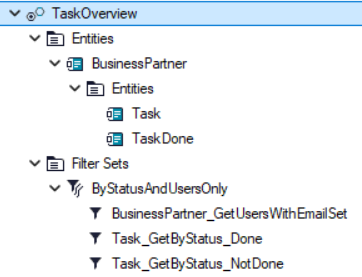
The entity Task is included in the data structure twice (as Task and TaskDone), and each time a different filter is applied — once for tasks that are done (Task_GetByStatus_Done) and once for the remaining tasks (_NotDone).
The filter setting in this data structure filter set may look like this:
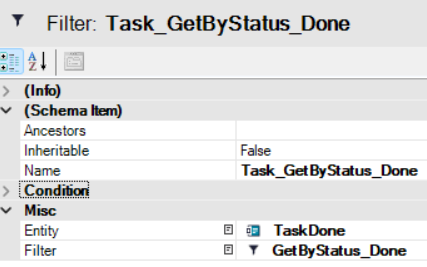
This setting means that the data structure entity TaskDone will be filtered using the filter GetByStatus_Done created under the database entity Task that is used in that data structure.
The last model elements you need to set up in order to make this work in the client application are:
-
The screen section properties where the filtering will be applied — here, you need to select the correct entity from your data structure in the
DataMemberproperty for that screen: -
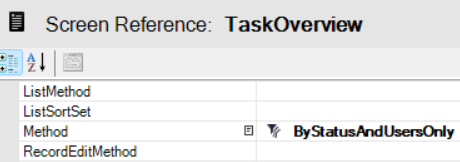
The screen reference that opens the screen — here, in the
Methodproperty, you need to choose the filter set used in your data structure on which the screen section is based:
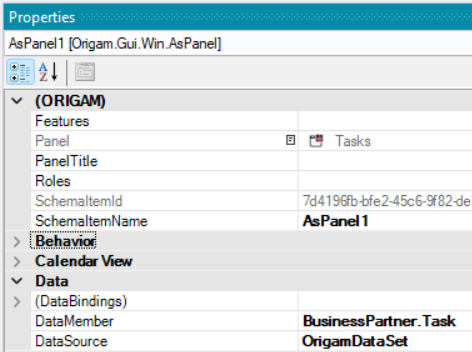
In our example, the data member is either BusinessPartner.Task or BusinessPartner.TaskDone, as shown in the data structure:
So, to sum up, if you want to create a screen with a custom data filter, you need to:
- Create a custom filter for your database entity.
- Create a data structure for your screen.
- Create a filter set in that data structure.
- Add your filter to that filter set.
- Create a screen section based on your database entity.
- Create a screen based on your data structure and place your screen section into it.
- Set the screen section property
DataMemberto the correct entity in your data structure. - Create a screen reference and select the filter set used in your data structure in its
Methodproperty.
After completing all these steps, the data in your screen will be filtered as required.
If your screen already exists and you only want to apply filtering to it, you only need to complete steps 1, 3, 4, and 7.