This document explains how to create and use a model element called Lookup and provides a basic understanding of its functionality.
Lookup, also known as Data Service Lookup, is an element in the ORIGAM model that is primarily used to populate drop-down menus. For example, when creating a new Task, you can choose its Priority by referencing data from the Priority entity (database table).

Lookup generates a list of data items from an existing entity. Once you select an item from the drop-down menu, it stores the selected item’s Id as a foreign key in the corresponding field.
Lookup can also be used when you need to retrieve a specific value based on a given key, such as fetching a user’s email based on their record Id. However, this guide focuses solely on using Lookup for drop-down menus. For more details on Lookups in ORIGAM, refer to this article.
It’s essential to understand that a Lookup is created for and under the entity that provides the data. When you create a lookup for an entity, you can then use it elsewhere. For instance, if you want to select a task’s priority, you create the lookup for the Priority entity and use it for the Task entity. It’s important to remember this concept well.
If you’d like to dive deeper into this topic, consider reading the basic concepts of the ORIGAM platform (TBD).
[!success]- Prerequisites for further work
Before you can create a lookup, you must meet the following 3 basic prerequisites:
In ORIGAM Architect, there are two methods for creating a lookup – using a wizard (action) or doing it manually.
Lookup with Action
To create a lookup, simply right-click on the entity in the Model Browser and select Action / Create Lookup:

A wizard will then appear:

In the first step of the wizard, select in the Display Field – the field you want to display in your drop-down menu. The Name field will automatically be populated using the default naming convention (EntityName_FieldName), which we strongly recommend you to keep.
To set up the Lookup for the drop-down menu, you also need to define the Id filter. Here’s what the form may look like:

Notice that the Lookup name has been automatically extended with the filter, resulting in a final name like Priority_Name_GetId. Again, sticking to this naming convention is highly recommended.
In the next step, you’ll see a preview of what the wizard will create:

If you need to make any adjustments, you can go back to the previous step by clicking the arrow at the top of the screen.
Once you’re satisfied, click Start to confirm the creation. A confirmation of the creation will appear:

Click Show Result to be directed to the Model Browser under the Find results tab:

You can then click on any of the created items, which will bring you to the Model Browser tree where that item is selected (for example, the newly created Lookup):

Double-click on your new Lookup to view its details:

We won’t go into the specifics of all the fields here, but note that this Lookup will display the field Name (ValueDisplayColumn) and store the selected record’s Id (ValueColumn).
For further details, you can check the Lookup documentation.
Manual procedure
To perform the same task manually without using the wizard, you must first create a Data Structure including Filter Set and Filter to be used in your Lookup, and then create the Lookup itself.
Here are the basic steps to follow.
Data Structure creation and setup
Each Lookup uses its own Data Structure based on existing entities. So the first step is to create a Data Structure and add the entity or entities you want to use in it. Data structures are essentially sets of entities. While entities describe a single dimension (entity / fields), data structures define hierarchical schemas. More details can be found here.
Now, let’s walk through the steps in Architect:
-
In the Model Browser, under your package, go to Data / Data Structures.
-
Right-click on your application package folder and choose New / Data Structure.

- Name the Data Structure using the naming convention
LookupEntityName_FieldName_FilterName:

Save it by clicking the Save button in the toolbar or pressing Ctrl+S.
- Right-click on the Data Structure name in the Model Browser and choose New / Entity to add an Entity to your Data Structure:

- In the Data Structure Entity details, select the entity you want to target:

You can either select the entity from the full list or use the search option:

In both cases, the Name will automatically be set based on the selected entity. Save it.
Filter Set and Filter creation and setup
A filter set defines a set of predefined entity filters that can be applied when loading data. Filters help limit the amount of data traveling over the network and consuming memory. Entity filters allow you to pre-define filters for an entity, making them easily selectable later in the data structure filter sets.
Let’s proceed with the next steps:
-
In the Model Browser, under your package, go to Data / Data Structures.
-
Right-click on your Data Structure folder and choose New / Filter Set.

- Name your Filter Set using the convention
Get+ “By“ +FieldNameyou want to refer to. The only exception is the Id field, where the name is shortened to GetId:

Save it.
- Right-click on the Filter Set you just created and choose New / Filter.

- Fill in the following fields:
Entity: Select the entity you want to filter.Filter: Choose theGetIdfilter.

Save it. Notice that the filter name is automatically generated using our filter naming convention – Entity_Filter.
Lookup creation and setup
Once you’ve created the Data Structure and Filter, you can now create the Lookup.
-
In the Model Browser, under your package, go to Data / Lookups.
-
Right-click on your application package folder and choose New / Data Service Lookup:

- Fill in the following fields:
-
Name: Use the default naming conventionEntityName_FieldName_FilterName -
ListDataStructure: Select the Data Structure you previously created. -
ListDisplayMember: Insert the name of the field you want to display in your drop-down menu. -
ListValueMember: Insert the name of the field you want to use as a reference (usually the Id). -
ValueDataStructure: Select the Data Structure you previously created. -
ValueDisplayMember: Insert the name of the field you want to display in the form after selecting it from the drop-down menu. -
ValueMethod: Select GetId. -
ValueValueMember: Insert the name of the field you want to use as a reference (usually the Id).
After filling in these fields, the form may look like this:

Save it and your Lookup is ready to be used.
Lookup with Entity and Field
Now that you know how to create a Lookup for an existing entity and field, you can learn a shortcut using an action that creates everything for you in one wizard:
- Database Entity
- Database Field
- Data Service Lookup
To use this shortcut, right-click on any existing entity and choose Actions / Create Lookup Field (incl. entity):

A wizard will open:

We won’t go through the entire wizard here, but after reading the above steps, you should be able to use this action wizard without further instructions. Just give it a try.
Lookup usage
Lookups define how to populate lists in drop-down menus and how to map selected Ids to names (or other fields) in both the user interface and business logic.
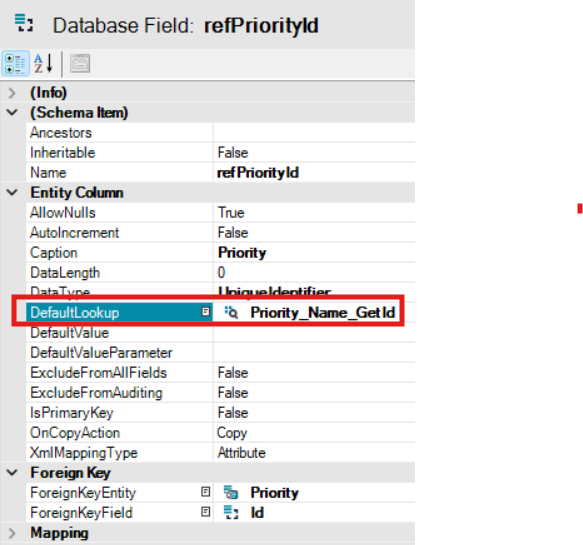
Once you’ve created a Lookup on an Entity, you’ll use it in database fields that reference that entity.
For example, here’s the default Lookup setup for the Task / Priority_Id field:
The full benefit of Lookups becomes apparent when designing drop-down menus in your app’s user interface.